Replace a blown fuse
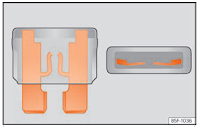 |
| Blown fuse |
Preparations
● Switch off the ignition, lights and all electrical equipment.
● Open the corresponding fuse box .
● Switch off the ignition, lights and all electrical equipment.
● Open the corresponding fuse box .
Recognise a blown fuse
A fuse is blown if its metal strip is ruptured
● Point a lamp at the fuse to see if it has blown.
A fuse is blown if its metal strip is ruptured
● Point a lamp at the fuse to see if it has blown.
To replace a fuse
● Remove the fuse.
● Replace the blown fuse by one with an identical amperage rating (same colour and markings) and identical size.
● Replace the cover again or close the fuse box lid.
Identifying fuses situated below the dash panel by colours
Black 1
Purple 3
Light brown 5
Brown 7.5
Red 10
Blue 15
Yellow 20
White or transparent 25
Green 30
Orange 40
WARNING
The high voltages in the electrical system can give serious electrical shocks, causing burns and even death!
● Never touch the electrical wiring of the ignition system.
● Take care not to cause short circuits in the electrical system.
The high voltages in the electrical system can give serious electrical shocks, causing burns and even death!
● Never touch the electrical wiring of the ignition system.
● Take care not to cause short circuits in the electrical system.
WARNING
Using unsuitable fuses, repairing fuses or bridging a current circuit without fuses can cause a fire and serious injury.
● Never use a fuse with a higher value. Only replace fuses with a fuse of the same amperage
(same colour and markings) and size.
● Never repair a fuse.
● Never replace a fuse by a metal strip, staple or similar.
CAUTION
● To prevent damage to the vehicle's electric system, before replacing a fuse always turn off the ignition, the lights and all electrical elements and remove the key from the ignition.
● If you replace a fuse with higher-rating fuse, you could cause damage to another part of the electrical system.
● Protect the fuse boxes when open to prevent the entry of dust or humidity as they can damage the electrical system.
● Always carefully remove the fuse box covers and refit them correctly to avoid problems with your vehicle.
● Always carefully remove the fuse box covers and refit them correctly to avoid problems with your vehicle.
Note
● One component may have more than one fuse.
● Several components may run on a single fuse.
● In the vehicle, there are more fuses than those indicated in this chapter. These should only be changed by a specialised workshop.
● Positions not containing a fuse do not appear in the following tables.
● Some of the equipment listed in the tables below pertain only to certain versions of the model or are optional extras.
● Please note that the above lists, while correct at the time of printing, are subject to change.
Fuses Underneath the instrument panel
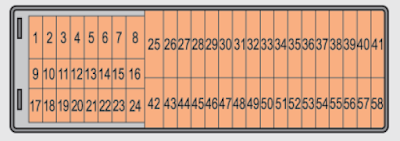 |
| Diagram of the fuse box to the left of the steering wheel |
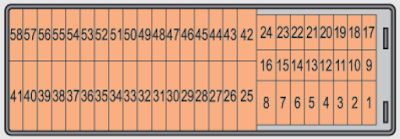 |
| Diagram of the fuse box to the right of the steering wheel |
Only replace fuses with a fuse of the same amperage (same colour and markings) and size.
Fuse placement
No. ... Consumer
1 Left light
2 Central locking, windscreen wipers, with Keyless Access
3 Ignition system relay
4 Right light
5 Electric windows - Driver
6 Central control unit - Interior lights
7 Horn
8 Towing bracket - Left light
9 Controls on steering column (without Keyless Access only), engine control unit (without
Keyless Access only), automatic gearbox control unit (without Keyless Access only), automatic gearbox lever (without Keyless Access only), ESP control unit (without Keyless
Access only), trailer hook control unit (without Keyless Access only), electric power steering
(without Keyless Access only)
10 Rear left window
11 Headlight washer unit
12 Radio and navigation display
13 Preparation as taxi
14 Control lever under steering wheel, light switch, traction locking with ignition key (automatic
transmission), headlight flasher, SmartGate control device, rain/light sensor, rear camera
15 Air conditioning system control unit, automatic gearbox selector lever, diagnostics connection
16 Instrument panel
17 Alarm sensor, horn
22 Windscreen washer system (without Keyless Access)
23 Heated front seats
24 Air conditioning fan, heating, control unit for air conditioning, heating
26 Front seat heating switch.
27 Rear window wiper
29 Airbag
30 Electric windows, reversing light switch, air conditioning control unit, Park Assist control
unit, exterior mirror, power supply for middle button bar, power supply for the side button
bar, interior mirror
31 Fuel pump, radiator fan control unit, cruise control, relay coil for the windscreen and rear
window washer system, switch for the lights
32 Diagnostics socket, headlight range regulator, control lever under the steering wheel,
ambient lighting regulator
33 Ignition relay coil, clutch pedal switch
34 Heatable washer jets of windscreen washer
36 USB charging socket
37 Radar
39 Additional electric heating
41 Rear window heater
42 Electric windows - passenger
43 Towing bracket - Connector contact
44 12 V connection in the interior, 12 V connection in the boot (Cigarette Lighter)
45 Rear right window
46 Windshield and front window washing system, control lever under the steering wheel
47 Towing bracket - Connector contact
48 Towing bracket - Right hand light
49 Fuel pump control unit
50 Radio
51 Heat for exterior mirrors
52 Keyless Access
53 Steering lock (Keyless Access)
54 ABS/ ESC ( Electronic Stability Control) control unit
56 Diagnosis
59 Full LED
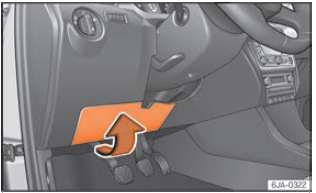 |
| On the Dashboard on the driver side: lid of the fuse box. |
● Carefully tilt the cover in the direction indicated by the arrow and remove it .
● After changing the fuse, replace the cover on the dash panel in the direction opposite that is indicated by the arrow so that the cover tabs fit into the slots on the dash panel. Subsequently, press down on the cover to close.
Fuses In the Engine Compartment
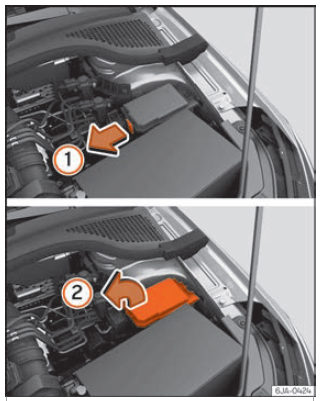
Press the locking tabs to release the fuse box cover
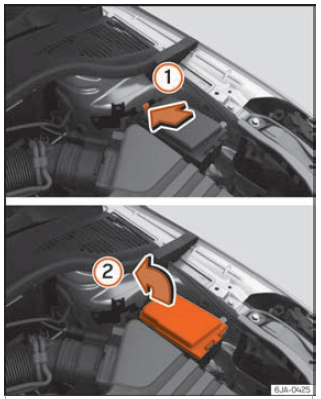 |
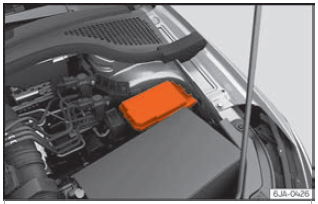
| In the engine compartment: lid of the fuse box - Variant 2 |
Only replace fuses with a fuse of the same amperage (same colour and markings) and size.
Opening the fuse box
● Open the bonnet
● Press lid locking clip upwards in the direction of the arrow 1 .
● Open the cover in the direction indicated by the arrow 2 .
● Remove the plastic clip from the lid of the fuse box.
● Replace the appropriate fuse.
● Place the plastic clip back in its original position.
● Place the lid on the fuse box and press until you hear it click into place.
● Open the cover in the direction indicated by the arrow 2 .
● Remove the plastic clip from the lid of the fuse box.
● Replace the appropriate fuse.
● Place the plastic clip back in its original position.
● Place the lid on the fuse box and press until you hear it click into place.
Fuse placement
No. ... Consumer
1 Radiator fan
2 Control unit for the glow system
3 ABS/ ESC control unit
4 Additional electric heat - Circuit 2
5 Additional electric heat - Circuit 3
6 Automatic gearbox
7 Engine control unit
8 Front windscreen wipers
9 Central control unit, battery data module
10 ABS/ ESC ( Electronic Stability Control) control unit
12 Engine components
13 Brake pedal switch
14 Engine components, fuel coil relay, radiator fan, coolant pump
15 Engine control unit
16 Starter motor
17 Engine control unit
18 Engine components, additional electric heat relay coils
19 Lambda probe
20 Control devices for the glow system, heating of the sump fan


No comments:
Post a Comment