
 |
| 2015 Citroen C4 Picasso |
Access to the tools
 |
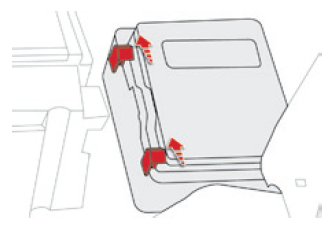
| The extraction tweezer is located in the dashboard fusebox compartment |
The extraction tweezer is located in the dashboard fusebox compartment.
For access to it:
For access to it:
- Open the glove box,
- unclip the cover by pulling at the top left, then right,
- disengage the cover completely, by carefully pulling in the direction indicated by the arrow,
- remove the tweezer
Before changing a fuse:
- disengage the cover completely, by carefully pulling in the direction indicated by the arrow,
- remove the tweezer
Changing a fuse
Before changing a fuse:
- the cause of the failure must be identified and rectified,
- all electrical consumers must b switched off,
- the vehicle must be immobilised with the ignition off,
- identify the failed fuse using the tables and layout drawings in the following pages.
To replace a fuse, you must:
- all electrical consumers must b switched off,
- the vehicle must be immobilised with the ignition off,
- identify the failed fuse using the tables and layout drawings in the following pages.
To replace a fuse, you must:
- use the special tweezer to extract the fuse from its housing and check the condition of its filament.
- always replace the failed fuse with a fuse of the same rating (same colour); using a different rating could cause faults (risk of fire).
- always replace the failed fuse with a fuse of the same rating (same colour); using a different rating could cause faults (risk of fire).
If the fuse fails again soon after replacement, have the vehicle's electrical system checked by a CITROËN dealer or a qualified workshop.
 |
| Good Fuse , Failed Fuse , Tweezer |
! The replacement of a fuse not shown in the tables below may cause a serious malfunction of your vehicle. Contact a CITROËN dealer or a qualified workshop.
Configurations
 |
| The type 1 electrical system does not have any fuses in front of the battery |
 |
| The presence of an additional fusebox in front of the battery indicates that it is type 2 |
The type of electrical system of the vehicle depends on its level of equipment.
To identify the type of electrical system on your vehicle, open the bonnet: the presence of an
additional fusebox in front of the battery indicates that it is type 2.
The type 1 electrical system does not have any fuses in front of the battery.
To identify the type of electrical system on your vehicle, open the bonnet: the presence of an
additional fusebox in front of the battery indicates that it is type 2.
The type 1 electrical system does not have any fuses in front of the battery.
Dashboard fuse Panel
.") |
| The fusebox is located in the lower dashboard (left-hand side). |
 |
| Dashboard fuse Panel Diagram |
- Refer to the paragraph "Access to the tools".
Type 1 fuse tables
Fusebox 1
Fuse N° ... Rating ... Functions
F8 5 A Steering mounted controls
F18 20 A Touch screen tablet, audio and navigation system, CD player,
USB ports and auxiliary sockets.
F16 15 A Front 12V socket.
F15 15 A Boot 12V socket.
F28 5 A START/STOP button.
F30 15 A Rear wiper.
F27 15 A Front screenwash pump, rear screenwash pump.
F26 15 A Horn.
F20 5 A Airbags.
F21 5 A Instrument panel.
F19 5 A Rain and sunshine sensor.
F12 5 A Keyless starting unit.
F2 5 A Manual headlamp adjustment control.
 |
| Fusebox 2 |
Fusebox 2
Fuse N° .. Rating .. Functions
F9 15 A Rear 12V socket.
Type 2 fuse tables
 |
| Type 2 Fuse box Panel Diagram |
Fuse N° .. Rating .. Functions
F3 3 A START/STOP button.
F6A 15 A Touch screen tablet, audio and navigation system, CD player, USB ports and auxiliary sockets.
F8 5 A Alarm.
F9 3 A Steering mounted controls.
F19 5 A Instrument panel.
F24 3 A Rain and sunshine sensor.
F25 5 A Airbags.
F33 3 A Memorisation of driving position.
F34 5 A Electric power steering.
F13 10 A Front 12V socket.
F14 10 A Boot 12V socket.
F16 3 A Map reading lamps in row 1 courtesy lamps.
F27 5 A Electronic gearbox gear selector.
F30 20 A Rear wiper.
F38 3 A Manual headlamp adjustment control.
Engine compartment fuse Panel
.") | ||||
| The fusebox is placed in the engine compartment near the battery (left-hand side). |
 |
| An additional fusebox is fitted in front of the battery, for type 2. |
Access to the fuses
- Unclip the cover, by pushing the two red latches towards the rear of the vehicle.
- Change the fuse (see corresponding paragraph).
- When you have finished, close the cover carefully to ensure correct sealing of the fusebox.

Type 1 fuse table
Fuse N° .. Rating .. Functions
F18 10 A Right hand main beam
F19 10 A Left hand main beam.
Type 2 fuse table
Fusebox 1
Fuse N° .. Rating .. Functions
F9 30 A Motorised tailgate.
F18 25 A Hi-Fi amplifier.
F21 3 A Hands-free starting reader unit.
Fusebox 2
Fuse N° .. Rating .. Functions
F19 30 A Front wiper slow / fast speed.
F20 15 A Front and rear screenwash pump.
F21 20 A Headlamp wash pump.
No comments:
Post a Comment