 |
| 2020 Seat (Cupra) Ateca |
Fuses and Relays
In general, a fuse can be assigned to various electrical components. Likewise, an electrical
component can be protected by several fuses.
Only replace fuses when the cause of the problem has been solved. If a newly inserted fuse blows after a short time, you must have the electrical system checked by a specialised workshop as soon as possible.
WARNING
The high voltages in the electrical system can give serious electrical shocks, causing burns and even death!
● Never touch the electrical wiring of the ignition system.
● Take care not to cause short circuits in the electrical system.
WARNING
Using unsuitable fuses, repairing fuses or bridging a current circuit without fuses can cause a fire and serious injury.
● Never use a fuse with a higher value. Only replace fuses with a fuse of the same amperage
(same colour and markings) and size.
● Never replace a fuse by a metal strip, staple or similar.
CAUTION
● To prevent damage to the vehicle's electric system, before replacing a fuse always turn off the ignition, the lights and all electrical elements and remove the key from the ignition.
● Protect the fuse boxes when open to prevent the entry of dust or humidity as they can damage the electrical system.
Note
● One component may have more than one fuse.
● Several components may run on a single fuse.
● In the vehicle, there are more fuses than those indicated in this chapter.
Fuses inside the vehicle
 |
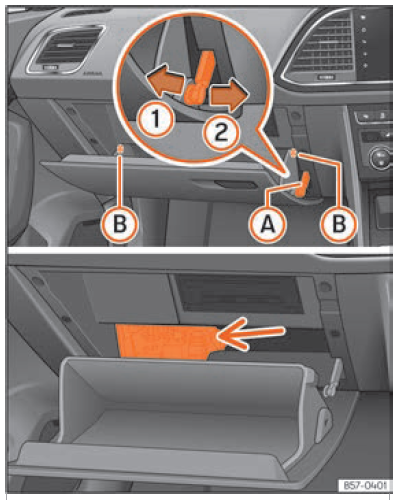
| glove compartment (right hand drive): fuse box access |
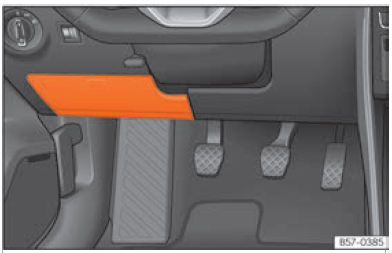
Opening and closing the fuse box situated below the dash panel (left-hand steering wheel)
● Open: fold the cover down
● Close: push back the cover it in until it clicks into place.
Fuses behind the glove compartment (right-hand steering wheel)
● Open the glove compartment and, if necessary, empty it.
● Undo the opening limiter A in two steps: first, unlock the limiter by pulling back on it (arrow 1) and then move it gently to the right (arrow 2). Remove the guide when the cover is in the normal opening position (30°).
● Free the side pivots B to release the cover to its second opening position (60°).
● Follow the same procedure in reverse order to return the glove compartment to its normal
position.
CAUTION
● Always carefully remove the fuse box covers and refit them correctly to avoid problems with your vehicle.
● Protect the fuse boxes when open to avoid the entry of dust or humidity. Dirt and humidity inside fuse boxes can cause damage to the electrical system.
No. ... Consumers ... Amps
1 Adblue (SCR) 20
4 Alarm horn 7.5
5 Gateway 7.5
6 Automatic gearbox lever 7.5
7 Air conditioning and heating control panel, back window heating, auxiliary heating. 10
8 Diagnosis, electronic parking brake switch, light switch, reversing light, interior lighting, driving mode, lit-up door sill, rain sensor 7.5
9 Steering column, coolant pump (T2C) 7.5
10 Radio display 7.5
11 Left lights 40
12 Radio 20
13 Driver and passenger seat belt pre-tensioner 25
14 Air conditioner fan 40
15 Steering column release 10
16 Connectivity Box 7.5
17 Instrument panel, OCU 7.5
18 Rear camera and surroundings camera 7.5
19 KESSY (Keyless Entry and Start System) 7.5
20 SCR, engine relay, 1.5 10/15
21 4x4 Haldex Control Unit 15
22 Trailer 15
23 Electric sunroof 30
24 Right lights 40
25 Left door 30
26 Heated seats 30
27 Interior light 30
28 Trailer 25
31 Rear lid control unit 30
32 Control unit for parking aid, front camera and radar 7.5/10
33 Airbag 7.5
34 Reverse switch, climate sensor, electrochromic mirror, rear power sockets (USB) 7.5
35 Diagnosis, headlight control unit, headlight adjuster 7.5
38 Trailer 25
39 Right door 30
40 12V socket 20 (Cigarette Lighter)
41 Driver and passenger seat belt pre-tensioner 25
42 Central locking 40
43 Beats Audio CAN and MOST. 40
44 Trailer 15
45 Electric driver's seat 15
46 USB socket 7.5
47 Rear window wiper 15
49 Starter motor; clutch sensor 7.5
52 Driving mode. 15
53 Heated rear window 30
In-line fuse/Amps (2019 - 2020 Models)
230 V rear power sockets 30
Engine compartment Fuse Box
To open the engine compartment fuse box
● Open the bonnet .
● Press the locking tabs to release the fuse box cover
● Press the locking tabs to release the fuse box cover
● Then lift the cover out.
● To fit the cover, place it on the fuse box.
● To fit the cover, place it on the fuse box.
Push the locking tabs down until they click audibly into place.
Fuse Table
No. ... Consumers ... Amps
1 ESP control unit 25
2 ESP control unit 40/60
3 Engine control unit (diesel/petrol) 30/15
4 Engine sensors 7.5/10
5 Engine sensors 10
6 Brake light sensor 7.5
7 Engine power supply 10
8 Lambda probe 10
9 Engine 20
10 Fuel pump control unit 15/20
11 PTC 40
12 PTC 40
13 Gearbox pump 15/30
14 Heated windscreen 50
15 Horn 15
16 Petrol pump 5/15/20
17 Engine control unit 7.5
18 Terminal 30 (positive reference) 7.5
19 Front windscreen washer 30
21 Automatic gearbox control unit 15/30
22 Engine control unit 7.5
23 Starter motor 30
24 PTC (Positive Temperature Coefficient) 40
31 Pressure pump 15 (2018 - 2019 Models)
33 Gearbox pump 30 (2018 Model)
36 Left LED headlight 15 (2020 Model)
37 Parking heating 20
38 Right LED headlight 15 (2020 Model)
36 Left LED headlight 15 (2020 Model)
37 Parking heating 20
38 Right LED headlight 15 (2020 Model)
Note
● In the vehicle, there are more fuses than those indicated in this chapter. These should only be changed by a specialised workshop.
● Positions not containing a fuse do not appear in the following tables.
● Some of the equipment listed in the tables below pertain only to certain versions of the model or are optional extras.
● Please note that the above lists, while correct at the time of printing, are subject to change.
● Positions not containing a fuse do not appear in the following tables.
● Some of the equipment listed in the tables below pertain only to certain versions of the model or are optional extras.
● Please note that the above lists, while correct at the time of printing, are subject to change.
Replace a blown fuse
 |
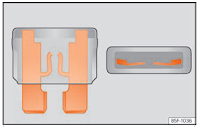
| Image of a blown fuse |
Preparations
● Switch off the ignition, lights and all electrical equipment.
● Open the corresponding fuse box .
● Switch off the ignition, lights and all electrical equipment.
● Open the corresponding fuse box .
Recognise a blown fuse
A fuse is blown if its metal strip is ruptured
● Point a lamp at the fuse to see if it has blown.
A fuse is blown if its metal strip is ruptured
● Point a lamp at the fuse to see if it has blown.
To replace a fuse
● Remove the fuse.
● Replace the blown fuse by one with an identical amperage rating (same colour and markings) and identical size.
● Replace the cover again or close the fuse box lid.
Identifying fuses below the dashboard by colours Colour Amp rating
Light brown 5
Brown 7.5
Red 10
Blue 15
Yellow 20
White or transparent 25
Green 30
Orange 40
Light brown 5
Brown 7.5
Red 10
Blue 15
Yellow 20
White or transparent 25
Green 30
Orange 40


No comments:
Post a Comment